Saturday, May 10 was the official start of the Presbyterian Coalition, Cobb Habitat for Humanity build in 2008. This is the third article in this series, the first covering the Traditional Dinner on the Slab which includes a slide show of 25 pictures and introduces the future homeowner, Nicole Combs and her son Elijah. The second article is the first in a series of a sort of Habitat Tutorial, Preparation for Build which covers some of the intense preparation that goes on behind the scenes before the volunteers show up. I say “sort of” because I am not an expert, but willing to discuss the various Jobs assigned to me and/or learned over the years. Hopefully most of it is close to right.
This article covers the first day the volunteers show up, and includes a slide show for the entire day with 115 photos, almost all including the volunteers. My photo is hopefully the only one not included, as I am behind the camera. To see the slide show of 115 pictures click here or on any picture below!

This is the start of work, 8:23 AM. Safety instructions and a pep talk have already been given by our SPM (Site Project Manager), Jeff Vanderlip. That’s Jeff in the middle of the site with the orange shirt and big floppy hat. The various top and bottom plates are still tacked together and strewn hap-hazardly all over the site.
The top and bottom plates are numbered and well marked so it doesn’t matter what order the walls are built or if anyone knows exactly what they are building. Grab a set, pull it apart, remove the tack nails, lay them about 8 feet apart and start adding studs, T’s, doors and windows. See the tutorial for good examples.

A half hour later, the walls are well on their way. many of them are completed, including the addition of a sill seal foam tape (blue) on the bottom plate. Some of the build is taking place in the driveway of the house in the background. Often we take to the street. To do a good job we do need a flat area so the components line up properly.

Measure it twice, cut once! The gentleman on the left is our “cut man” for the day. The one on the right is “Pretty Boy” Miller, also known as “9 fingers”. He is our grand master of carpenters and a super-volunteer.
Getting Copies
The pictures shown here and in the slide show do not have the resolution you can get if you download them from the Flikr site. Go to the slide show and click on the link at the top left of the slide show to get to the full set at high resolution, or click on any picture in the slide show and then click on View Main Page. Once there, you can click on the button above the picture “All Sizes”. It will open in the large size, but you can download any picture in any size free, or can order prints through the site that will be delivered in about an hour to your nearest Target store. It’s not obvious how to get to the Target option. First put a print in your shopping cart. When ready for checkout, you can send your prints to Target for printing for about 15 cents per copy or have them mailed to your home.
In addition, you can go to “Zassle” and have T-shirts, coffee mugs etc. made with your favorite print. Enjoy. Below are selected prints but only a small sample of what is available for free download.
First Wall

Nicole installs the first wall to go up! This is always a photo opportunity and can’t be missed. There are several other shots of this in the slide show. The time is 9:09 AM, barely 46 minutes after we started! The all important wall brace is being wrestled into place on the far left. All the walls are braced by long 2×4’s to hold the walls vertical and to make sure they don’t get pushed over by loose walls stacked against them or a tired soul leaning heavily in the wrong place. Long stakes are driven into the ground and the brace is poked through the top of a window or doorway, if available, and nailed at each end when the wall is perfectly vertical.

The second wall. It includes a window unit and a couple of T’s. This is the back of the house and includes the utility room and a bedroom. Notice the brace at the left. Another is being readied off camera for this wall. There was no window or door in the first wall so the brace is through the wall itself. The reason for using window and doors for the braces is so that later much of the outside sheathing can proceed without removing the braces.

Neat Suspenders.

Time for a break. Picture windows make good seats. Don’t worry, I have front views of all these people in the slide show, including this one. Hmmm, more suspenders.

OK, these oldtimer’s deserve more respect. They are both Gray Ghosts and SPM’s as well. The Gray Ghosts are generally expert carpenters and woodworkers that have retired but like to stay busy helping the Habitat cause move along. When things don’t go right or don’t get finished, the SPM puts in a request for Gray Ghost help. They slip in after the volunteers are gone, review the work and fix any problems or complete any incomplete work so that the job stays on schedule. The volunteers may notice that someone finished the roof or fixed a window or completed a porch and wonder who did it. The answer is always “a gray ghost”. Unsung heroes to me. There is no telling how many houses they have led and how many more they have worked on as ghosts.

Hmm. Looks like Debbie found her job! Debbie is also an SPM and has already completed her house on this same street. She has lead many houses for her local high school and now that she is retired, continues on.

Every body is busy. Except for me, of course. I put the camera down from time to time to pick up my hammer, but to tell the truth, at my age, I can’t do that much anymore. I did plaster a few OSB walls with nails pretty well however. I’m trying to document the progress with the intention of keeping a working tutorial of the build. Wish me luck.

I believe the 5 people nearest the center of this picture are all board members or past members of the Presbyterian Coalition, 6 counting the guy behind the camera. There are many more on the site today. Everybody works.

Food on the way. Hamburgers and Hot Dogs. Each week a church has volunteered to fix the meal and serve drinks. The assigned church also provides the opening prayer and the food blessing and often a devotional at lunch time. First Presbyterian always provides the meal on the first day of build and Macland Presbyterian provides the meal for the last build day. Often the meals are donated by local restaurants. For example sometimes Papa John’s will provide free pizza dinners or perhaps Williams Brothers Bar-B-Que or Subway. Others are home cooked or maybe sandwiches. It doesn’t matter, we are so hungry you could serve worn out shoe leather and no one would complain.

This young lady is cutting insulation into strips to insulate the T’s. All of the outside walls must be insulated and no exceptions are made for small gaps. You may be able to see an insulted T in the far wall above her head. The T’s and corner posts must be insulated now because the OSB sheathing will cover much of it before the day is over. Another area to be insulated early will be the areas behind the tub enclosure before the tub goes in. Insulation can be a problem if the various inspections delay us from getting other things done. So very often a special day is set aside for a midweek day to insulate the walls. It has to be done after the house is dried in and plumbing and electrical done, but before the drywall goes up.

This is our leader, our SPM. Jeff Vanderlip, a tireless worker and hard task master. Always urging us to “have fun” then assigns us the most dreadful tasks.

This picture may look a little fuzzy but that is sawdust sprinkling down in front of Terry Barton’s face. It is particularly fine sawdust because he is using a metal cutting blade to cut a window opening – it was all he could find. I had a proper blade in my truck as did probably 5 others. Terry is our finance officer and past president of the Coalition. He is also a Master Gardner and does genetic family research on the side (or something like that). Anyway he can tell you if you are related to Napoleon or the guy you thought was a great great grand daddy but you’re not certain.

Here the house frame is being straightened and aligned with the aid of a couple of blocks of wood and a tight string. The block he is holding is positioned behind the string while others move braces inside the wall to bring the wall into perfect alignment. The technique is to put blocks at each end of the top of the wall, tightly stretch a string between them and adjust the wall to a third block that is moved between the wall and the string. The walls are virtually complete.

I was asked to capture these two together and just at that moment, one tried to get away.
There are about a hundred more pictures on the slide show and I’ve sort of randomly selected a few representative shots here. There is another slide show coming up as part of the continuing tutorial if anyone is interested in that. You would be amazed how many people visited last year’s pictures doing searches on construction such as “Hardi Plank” or “roofing” or “siding” or “framing”.
Job Well Done

Well, here is the last picture for the day. The time is 3:10 PM and everybody is gone, some 7 hours after the official start of the day. The house is sheathed, openings cut, all the walls are up and perfectly aligned, the porch beam is installed and the house is completely ready for the roof trusses that will go up next Saturday. Incidentally, the pole at the end of the house is a safety pole to hold the first roof truss as it goes up and prevent it from toppling over. The pole will remain in place until all the trusses are up and the roof completely braced and stable. There is a catwalk used for safety purposes installed over the living room that I’ve not shown. It will be in the tutorial and will come down after the trusses are in. Safety is much more important than finishing the house.
Click here or on any picture for the slide show and for access to the full sets of pictures for free downloads or for ordering prints.
Enjoy,
Oldtimer


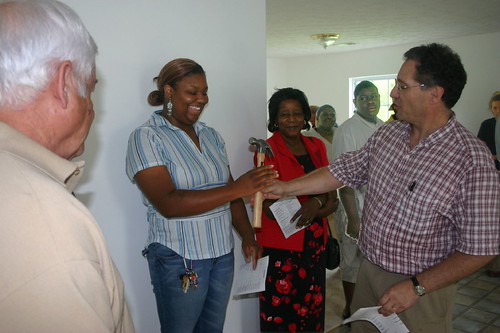


 I found out today that Joi (photo), our future homeowner of the Habitat for Humanity house we are building for her in Mableton, Georgia, had her furniture and other belongings stored in a storage locker while waiting for her new home to be built.
  Presbyterian Coalition Habitat for Humanity Slide Show of all the pictures made by Oldtimer at the Dinner on the Slab, May 4, 2007.
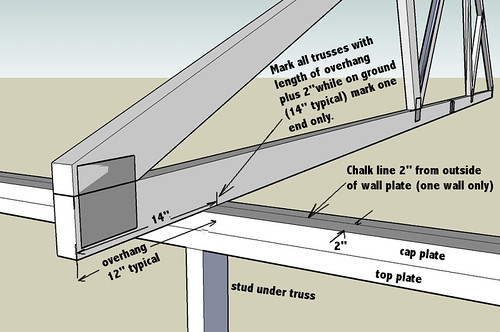
 First truss Someone had come in during the previous week and put up safety poles at one end of the house. Probably Jeff, the Site Project Manager (SPM) and the “Gray Ghosts”. That allows the first roof trust to have something to rest against and to tie to because it is the key to having all the trusses line up properly as they go up. All the other trusses are tied back to the first one. Thus the safety poles serve to stabilize the trusses all the way across and assure none of them fall over and start a deadly domino reaction. The Gray Ghosts, by the way are an organized group, usually retired builders and handymen, that come in mid week and repair anything that is put up wrong and/or was not finished. They are volunteers that work one or two days a week to make cetain that builds proceed smoothly. Since they are usually unseen by the volunteers, they are in effect ghosts. They usually come at the invitation of the SPM.
  Finally it was nailed securely into place. Each of the remaining trusses were hefted up in a similar fashion. One “safety man” had the job of making sure that no one working on the top side was caught between an incoming truss and walls or trusses already in place. Thankfully no one got hurt. Special jigs hold the tops of the trusses exactly two feet apart and keep them from falling over. Usually long 1×4 boards are nailed truss to truss across the top edge to ensure they do not separate or fall over. These are removed as the decking 4×8 sheets of OSB go up. This year we also had metal truss spacers that remain permanently.
 The picture at the left shows the spacer jigs on the first two trusses and the smaller metal truss spacers on the rest. 1×4 boards were added later as the number of trusses began to worry us about safety. If one of these trusses fall over they might all fall over and someone would definitely get badly hurt. We don’t take chances on Habitat builds.
 The last truss. The last truss was lifted entirely from the outside of the building. I think this is the most dangerous point of any build. The last truss is heavier than all the others due to the added OSB on the end, and it has to be raised straight up into position. The technique is to get it positioned below the wall and then lift it to the top of waiting stepladders. Wise Guys steady the truss against the wall and the ladder men climb the ladders to get a higher grip. Finally the whole thing is lifted into position. It could easily slip off the 1.5 inch ledge it sits on and it could also easily tip too far toward the other trusses and leverage itself off the ledge or with real tragic results tip backward and fall on the whole crew. Thankfully it went smoothly.
  Other things going on. Even before the first truss went up, there was a crew set up to wrap the house in a waterproof wrap. In this case Tyvek. It seems as if it is a rule that this stuff always goes on upside down. It actually depends on which direction you choose to wrap the house. Right to left, right side up. Left to right, upside down. Guess which way everyone goes. Once the wrap is started, another crew begins marking the studs on the edge of the slab and marking vertical lines on the wrap. These are so the siding nailers can
  find the studs easily. Also once the wrap is started, the window installers go to work. Each window is set into place and nailed in. Then someone comes behind them and puts on vertical and horizontal strips of tape to seal the window edges from any chance of leaking. There is a strict procedure on the order of installing the strips.
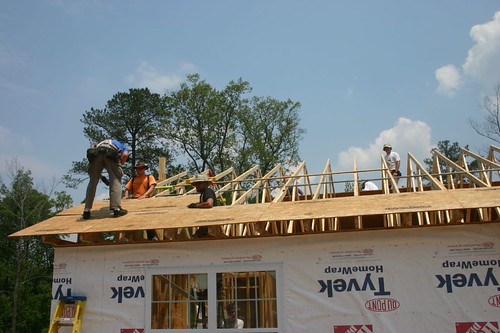 inch out of alignment on the other end. Several attempts to use the 47 inch marks (gives 1 inch overhang) gave bad alignment due to the rafters being shifted ever so slightly from one to the next. Finally a string was snapped from one end to the other and the first sheet was properly aligned on that. The decking proceeds from one end of the house to the other, then by rows above that. Soon there are 4 to 6 people on the roof working above the first row.
 The porch and storage/laundry roofs use small trusses that span their length. Once the trusses get to the edge of the main roof, the remainder of these smaller roofs are “stick built”, meaning they are constructed using hammer and nail. Once a deck is completed a crew begins covering it with tarpaper. We didn’t get that far today.
 This Oldtimer cut out about here (picture above), with the roof less than half decked. The previous week I was so pooped I could hardly keep my eyes open going home. Sorry guys I left a little early. Boss’s orders. You don’t keep a bride 48 years without knowing when to say OK!


